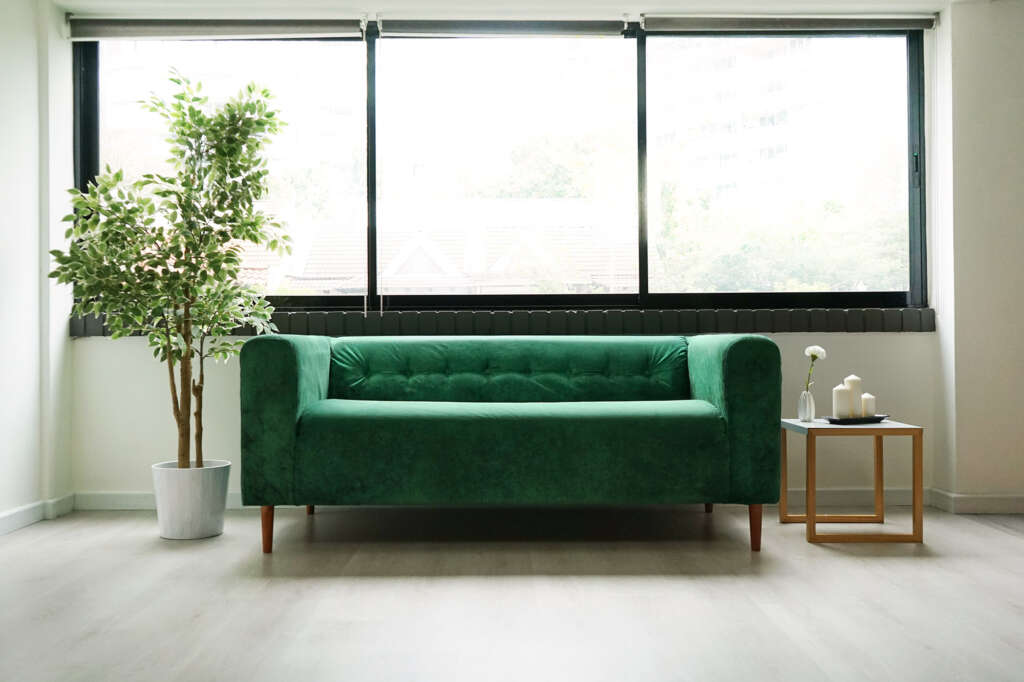
With St Patrick’s day coming up and 2017’s Pantone colour of the year, we’ve decided to bring in a hack for all lovers of the colour – Green.
And what better way to do it then to showcase it alongside our Rouge Emerald velvet slipcover, upgraded with new legs and Chesterfield-inspired sofa tufting.
But first, here’s what inspired us to do so:
The Inspiration
Chesterfield Tufted Sofa c/o AnnaSuiShopA few of us here really like the Chesterfield sofa and were thinking, “Wouldn’t it be really cool if we could hack a sofa into a Chesterfield, like the Klippan?”
And that was the lightbulb – the Klippan is pretty much like the Chesterfield minus the round arms and tufting.
Brayden Studio Verdi Tufted Sofa c/o WayfairThen we thought maybe we should be a bit more realistic and consider other options since the Chesterfield’s trademark look is precisely because of the round arms (something that we can’t really create) and tufting (something we can definitely do).
We continued searching and eventually we found something we liked.
Simple Tufted Sofa c/o Dylan GalleryA square-arm sofa with a very modern and minimal look, something we thought we could recreate very easily.
Thus began our journey, here are the before photos:
The IKEA Klippan – Without Slipcovers IKEA Klippan with Rouge Emerald CoversThe Prepwork
First and foremost, here are some tools that you’ll need:
– 1 Comfort Works Klippan Slipcover (Assuming you already have an IKEA Klippan)
– 1 Tufting Kit (Twine, Needle, Scissors, Buttons)
– 1 Pencil for marking
– 1 Ruler
– 1 Willing Friend/Partner who can help you
Next, you’ll need to decide on how much tufting you want to do. Initially we wanted to do the entire sofa, back and armrests – the whole shebangs.
That was when we thought the Klippan could become a Chesterfield, but we realised that it’s best to have it minimalist with its square arms, so we settled for 8 buttons the end.
As such, using my expert mathematical skills, we figured a 15.6cm gap between each button would work the best.
The Fail
Before we move on to the full instructions, here are some things you SHOULD NOT do because we did – and realised we made a mistake.
We flipped the couch – DON’T do thisBasically start measuring and calculating to see what would be the best way to get 8 buttons placed equidistant from each other.
The problem unfortunately, was that we marked and measured from the back instead of the front – where we’re supposed to be putting the buttons on.
Here are some photos documenting our silliness nonetheless:
The Hack
Lesson learned: Instead of marking where you want the buttons to be at the back, mark it at the front on the slipcover – a white chalk from the tufting kit would work.
And yes, we didn’t take pictures here because we wanted to jump straight into tufting.
Surprisingly the board used in the Klippan wasn’t as thick as we imagined, so the needle poked right through fairly easily with some elbow grease.
First sign of the needle going throughOnce the needle’s through, tufting it with a button is the easy part.
If you have forgotten how this works – check it out in this tutorial:
The tricky part would be tying it to the back of the sofa, so it’s important to make sure you use about an arm’s length of twine to get it to the other side and onto the springs of the Klippan sofa.
The best part is that if you don’t like how deep the buttons are tufted into the cushion, you can adjust them by moving the string accordingly – you will need a friend on the other side to push the button in more for a more obvious tuft.
And yes we’ve tested – the springs are thankfully safe, and will not break upon sitting.
You can also see how uneven my “arm’s length” was throughout the process but hey it worked out fine at the end!
Here’s how the front looks:
It gets easier once you get the first and second tufts done; You’d have completed it before you know it.
Okay, it did take us about 2-3 hours in total at the end as we did have to figure out measurements firstly, make a mistake and then get the job done.
The Reveal
And there you have it, an IKEA Klippan sofa hacked with a Rouge Emerald slipcover and tufting buttons.
Looks pretty damn premium and “not IKEA” yea?
It’s no surprise that this would be one of IKEA’s most popular sofa – check out our IKEA Klippan review here.
Want a Klippan sofa now? Let us know what you think in the comments below!







Barry
Nov 12, 2021Is it possible to do something similar, like a channeled effect instead of traditional tufting?
Naomi
Nov 12, 2021Hey Barry, thanks for the question!
I suppose technically, it can be done on a DIY basis. However, tufting with a channeled effect may be a little more challenging, since it would require consistent stitching in a straight line from one end to the other (or however long you’d want the channeled tufting to be). Traditional tufting is easier to do and maintain since each button is tufted individually. It also does not risk removing he other tufts if one button pops/loosens out.
We’d recommend consulting with an upholsterer before attempting a DIY, just to be sure that it can be done safely :)
Hope this helps!
Alex
Jun 5, 2020This looks amazing and I am going to try it myself in the coming weeks. Can I ask – what size buttons did you use?
Ning Lim
Jun 6, 2020Hey Alex, we used our own tufting kit! You can get them here, standard-sized buttons.
https://comfort-works.com/en/tufting-accessories/tufting-kit-402/?FM-07,B24
PJAI
Jun 9, 2017Hi there,
this looks amazing! What height are the legs? And are they the Bailey ones?
Chuck
Jun 12, 2017Great eye!
Those are the (cherry) Bailey legs indeed, at 170mm :)
Kristy Jetson
Apr 17, 2017I love this ! I’m thinking about doing this to my couch – but I’m not very creative.
Chuck
Apr 18, 2017Hey Kristy!
I’m sure you’ll be able to do this (if I could, anyone can) – I’d like to think that I was being more of an engineer when I did this, and I had a great friend (and photographer) to help me out with this :)
Always good to have a partner to help you out, it’d definitely make things a lot more fun and easy!
Orlagh
Mar 26, 2017I did exactly the same with my green velvet klippan, except I’ve seven buttons (the middle tuft went through the cushion dead centre but was driven through the plywood at an angle to avoid the piece of wood in the middle at the back of the sofa. I used some old buttons in the same way you double tuft rather than tying off on the springs. It made it a 45 min one person job. 30 mins of which were reminiscing distances. (Approx 18 cm between buttons). The brilliant thing with tufting the klippan, the cover doesn’t slip as much anymore!
Chuck
Mar 27, 2017Hey Orlagh!
We almost did 7 and the funny thing was that we noticed after a few measures – the piece of wood isn’t even dead centre! But alas, we’re quite happy with 8 and glad you managed your way with your very own personal touches :)
Would be nice if you had a photo or review somewhere so we could link you in case people preferred to double tuft, or go with 7 buttons instead.
Good to know the Klippan was upcycled instead of getting tossed away!