Manstad lover, you can stop holding your breath now. Custom made slipcovers for the IKEA Manstad corner sofa bed is now readily available at Comfort Works. ( Can we get a whoop-whoop! ) Below is the SNUG FIT version of the slipcover. For the LOOSE FIT version, click here.
Remember Eddie Ross’ Manstad Makeover? They were right. To get the best possible tailored-fit, the Manstad needs to be covered in separate pieces. And since we’re in such a fabulous mood, this post includes a step-by-step on how-to-fit the Manstad Snug-Fit slipcover.
Scroll down if you just want to look at the finish result. Otherwise here’s a step-by how to install the snug fit cover.
1. Put your IKEA tool box to use! In case you lost the original Allen keys that came with the Manstad, you’ll find them in this orange box of awesomeness. You will also need the screw driver and two different heads.
2. Dissemble the sofa completely. To get the best possible tailored- fit look for your Manstad, you’ll have to start by taking the whole sofa apart. As seen below, each piece has an individual cover. You do not have to remove any of the original skin, for the exception of the pillow covers and the velcro-ed piece of the storage compartment. Tip: Remember to keep all the screws in one area- like say inside a mug.
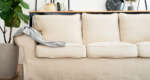
3. Put the covers on. We recommend having a buddy to help you out. Ensure that the top four corners of the slipcover are securely on, before it is pulled down. Repeat this for every piece.
Certain covers have velcro straps (only for models bought after 2008) – secure them after slipcovers are adjusted and fitted. Tip: If you can’t figure out which slipcover is meant for which piece, trace the piping of the original sofa and match it with the piping on the new slipcovers.
4. Reassemble– Like a jig-saw puzzle, always start with the outer corners and work your way in-wards. If you forgot how to put the Manstad back together, refer to the instruction manuals below:
For models bought before 2008, please download this assembly instruction: LINK.
For models bought after 2008, please download this assembly instruction: LINK.
If you don’t know which year your model was bought in, please refer to this post: LINK.
Apart from the big rectangular holes on the sides, you will need to manually create screw holes. The screw holes can be made by creating a small incisions in the fabric, using this screw head below (available in your IKEA tool box). This gives you the freedom to swap your Manstad chaise from left to right.
5. Lastly, lets not forget the pillows. Again, fit all four corners, then pull. Tip: Using one hand to push the pillow in, while the other hand zips- makes life a whole lot easier.
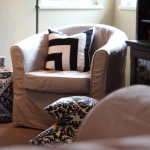
And here you go, a custom made sofa slipcover for the handsome IKEA Manstad Sofa Bed.
Fabric for the Manstad slipcover shown, is our very own textured cotton blend – Nomad Black, link here. The curtains are made in Lino Broadweave, and cushion covers in Lino Brushed fabric.
Manstad Sofa Slip Cover
Product page and prices can be found here, Manstad Sofa Slipcover.
Important Note:
- The custom slipcover shown above does not come with a cover for the pull-out compartment.
- Older Manstad models (bought before 2008) will require some DIY for the storage compartment’s velcro strips
- If you don’t know which year your model was bought in, please refer to this Post.
- As the positions of the bolt and screw holes are different for late and early models of the Manstad, some manual incisions are required.
- Manstad models before 2008 do not have a velcro-ed section, as shown in the picture below. Please let us know if you need additional velcro strips to be stapled down (they’re free). Using velcro strips will allow you to remove them for washing.
Leave a comment on this post
Read more on sofa guides


Behind the seams
Why replace when you can refresh?
Our sofa covers give your sofa a brand-new look without the cost or hassle of buying new.
Find your perfect couch cover